Ultralight Quad Build : FlightClub PROton
Ultralight Quad Build : FlightClub PROton
Part 1 of the FlightClub PROton build series: Ultralight Quad Build PROton
** EDIT **
In the video at 21:30, I soldered the Smart Audio wire to RX6, it’s suppose to go to TX6. It’s the pad closer to the button.
This ultralight quad build PROton is currently my favorite race setup. As I mentioned in a previous post, I’ve got several PROton builds coming up. So far I’ve got plans for an ultrafast PROton, 6″ long range/freestyle and this build the Ultralight quad build. So each one of these builds have a different pilot in mind. What do you expect from the most versatile frame on the market?
- Ultrafast PROton is for hardcore racers that can blitz around a track close to 100% throttle.
- 6″ long range/freestyle PROton is perhaps for people who are tired of flying DJI Phantoms and want to get into FPV but not quite ready to go balls to the wall fast around a track. It will use the TBS Crossfire Micro. This quad is so much fun to just cruise around a park with some freestyle. The way I have it setup I can easily fly half mile away (it can go further than that but I haven’t had a chance to get out in a big wide open area to safely test it) and get flight times of around 6 – 8 minutes. One of my favorite things to do is find a flock of birds and go fly with them. It’s so much freaking fun.
Who is this ultralight quad build for? Depending on the motors your use, it can be setup for a casual intermediate pilot looking for longer flight times and something not crazy powerful so they can learn how to race. Or an ultralight quad with powerful motors. Currently this setup is my favorite setup. It took me a while to realize that running big powerful motors doesn’t always mean you’ll go fast. In fact it just made me crash faster and go slower. The reason for this is because with big powerful motors I hardly ever got above 70% throttle and if I did it meant I overshot my lines which usually results in a crash.
Unless you can fly like EnvyAstro, there are several advantages with going with less powerful motors.
- It lets you use the entire 100% throttle range. This makes the quad much easier to control
- Less powerful motors usually means an increase in efficiency. I’m getting around 6 min on a 4s 1300mAh
- Lighter motors equals lighter quad. Less likely to break arms
Ultralight Quad Build List
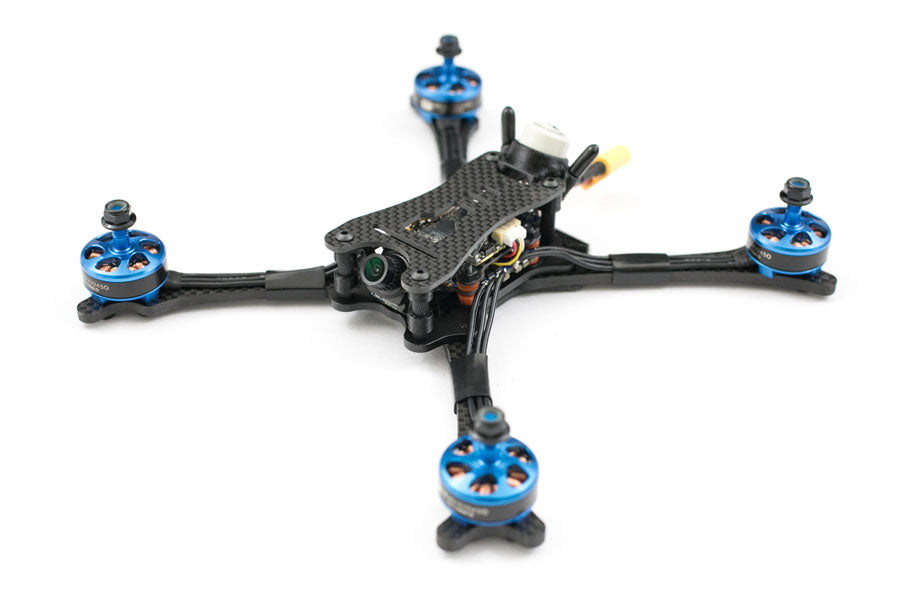
- FlightClub PROton Skeleton with 5″ Race arms
- Cicada F4 30A ESC with BetaFlightOSD
- FrSky XM+
- Foxeer Arrow Micro 2
- TBS Unify RACE VTX
- U.FL AXii LHCP antenna
- Tmotor Air40 2450KV
Initially I build this ultralight PROton with the 20g Hyperlite 2204 Floss motors which came out to be a 215g quad. It flew nice but those motors felt a little underpowered and the quad was actually too light. I normally run a 1300mAh with this ultralight quad but with those motors I found myself strapping on bigger batteries just to weigh down the quad. The 20g difference between a 1300mAh and 1500mAh made if flew much better. So I changed to the 25g Tmotor Air40 2450KV which made this PROton the perfect balance between weight and power. This sucker flies like a surgical scalpel.
Weight of the PROton Ultralight Skeleton with different motors
- Hyperlite 2204 – 218g
- Air40 2205 – 238g
- Tmotor F40 v2 – 251g
Other parts used in this build
- PROton LED plate makes mounting a LED super easy and clean
- Bondic great for securing U.FL connector
- Gorilla Glue Double Sided tape – super strong stuff
- Weller WESD51 Soldering station
- Rosin core solder
- Soldering Vise
- PROton GoPro Session Mount
- GoPro Session
- HQ Props 5040 tri blade vs1
A build kit is available for this build. It includes all the misc parts (heat shrink, m3x16 screws, 20mm standoffs, XT60…), the cheat sheet, Taranis file and BetaFlight CLI program files.
If you’re never soldered before check out this post. It’s really easy and fun.
Enough fluff, lets build!

As with any new quad build, it’s good practice to first connect your flight controller to BetaFlight to make sure all is good. It’s a pain to do the build then when it comes time to do the BetaFlight part and the board won’t connect. But for the sake of this post I will show the build first then do the BetaFlight part.
Using the Cicada 30A F4 AIO makes this build a breeze! It eliminates the need to connect any ESC signal wires. All you have to do is solder the battery cable and it will power the ESCs, flight controller, camera and VTX. The Cicada 30A AIO uses a F4 flight controller with built in OSD (on screen display). This means if you use a receiver like the XM+ you can access your PIDs and change VTX band/channel/power on the TBS Unify VTX from the OSD.
Assemble the PROton
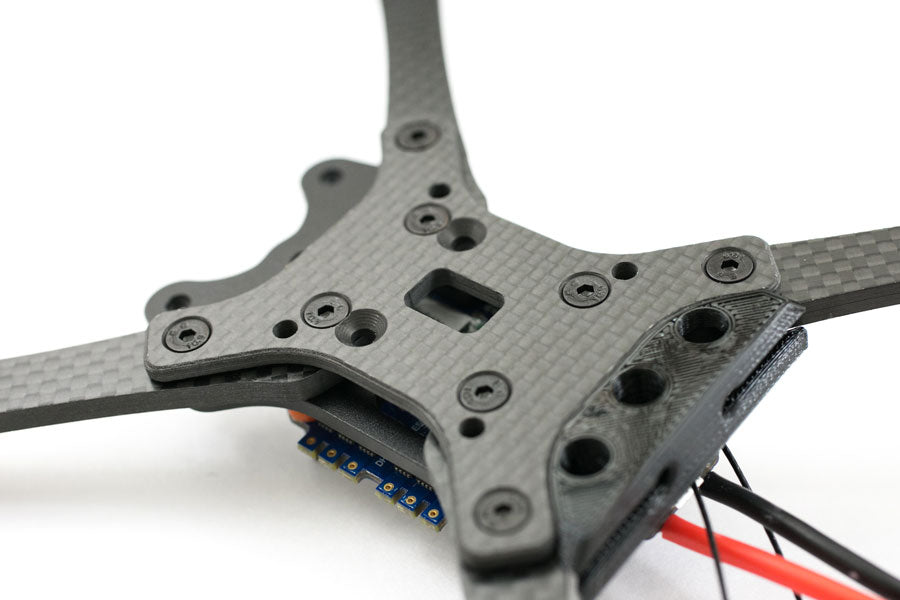
With a frame like the PROton, the best way to mount the flight controller stack is with 4 long metal screws. The butter mounts isolates the screw from touching any hard surfaces. You’ll never have to worry about broken nylon standoffs or motor vibration issues.
Squeeze the butter mounts and push them into the raised sections on the Nucleus plate. Insert the M3x12 screws through the butter mounts. Sandwich the arms between the nucleus plate, bottom carbon fiber plate and tighten the screws right into the nucleus plate.

Use some extra wire from the Foxeer Arrow camera and cut three wires about 3/4″ to use for the XM+. Solder the wires and install on the Cicada AIO. The XM+ will be double sided taped on the bottom of the flight controller with the bind button close to the center of the stack. This will line up the bind button to the opening on the bottom cf plate.


Install the arms on the frame. Go ahead and mount the LED plate now because the way it mounts is it sandwiches between the bottom plate and the nucleus plate. Cut the motor wires and mount them on the arms.


Prepare the wire harness for the TBS Unify race to be mounted. Cut the wires and pre-tin the wires with solder. Solder the power leads to the battery, yellow wire to the video out (VO) and the white Smart Audio wire to TX6.
Cut the wire harness for the Foxeer Arrow Micro. Connect the yellow wire to video in (VI).

That’s pretty much it for the actual building of the quad. That’s why I love this Cicada 30A F4 AIO, it’s so simple to build.
BetaFlight Setup
Before we get into BetaFlight we need to bind the XM+ to the Taranis. For the sake of keeping this post shorter I won’t get into how to set up the Taranis. I’ve done that several times in my other builds like the QAV-X build. If you don’t wanna mess with setting up the Taranis, I made my Taranis backup file available. This is how the Taranis is setup:
- SD switch, AUX1 – up is Arm, down is beeper
- SB switch, AUX2 – up is enable turtle mode
- SE switch, AUX3 – is open on this build. you can assign it to stability, horizon or acro if you’d like
- SC switch, up will reset the flight timers
First watch this video on how to bind the XM+ to the Taranis. Once the binding procedure is done unplug the battery and turn the Taranis off. When you power back on the XM+ should be bound. Sometimes it takes up to a full minute for it to bind the first time after plugging in.
Download correct version Betaflight 10.1 for your computer and install it. If this is your first time using BetaFlight make sure you download the CP210X and VCP drivers for your computer. If not you won’t be able to connect to the flight controller
Flash the Cicada 30A AIO
- Plug the Cicada 30A AIO to your computer via USB cable.
- Click Firmware Flasher
- Select OMNIBUSF4, then I usually choose the most current version. As of this post it’s 3.2.4
- Select Load Firmware
at the bottom - Flash Firmware
I won’t go into every single step of the BetaFlight setup here, watch the video. I will just go over the highlights:
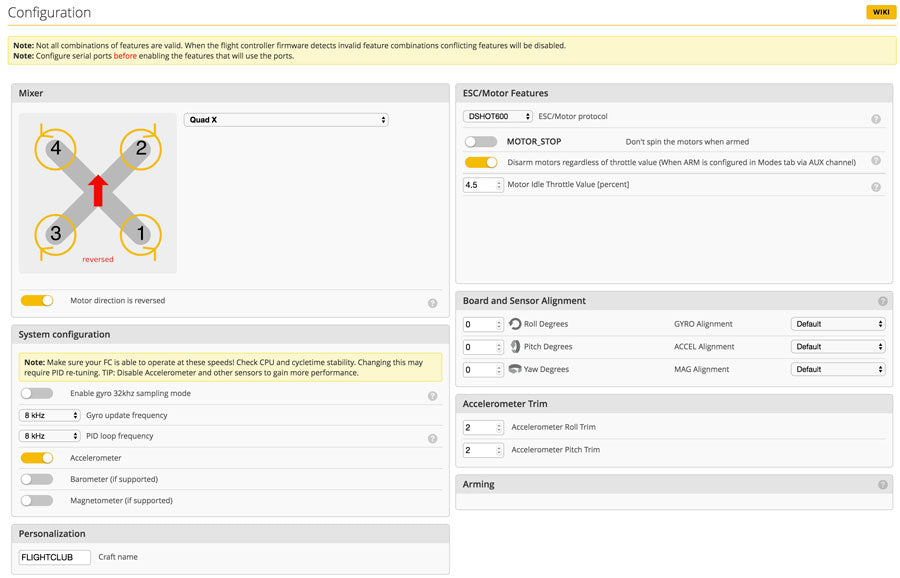
Be sure to do this with the props off. First go to the motors tab to make sure the motors are all spinning the correct direction. Spin up each motor and make sure they spin in the direction like the diagram on the top left. If a motor isn’t spinning the correct direction you can reverse it in BLHeli Configurator.

BLHeli Configurator
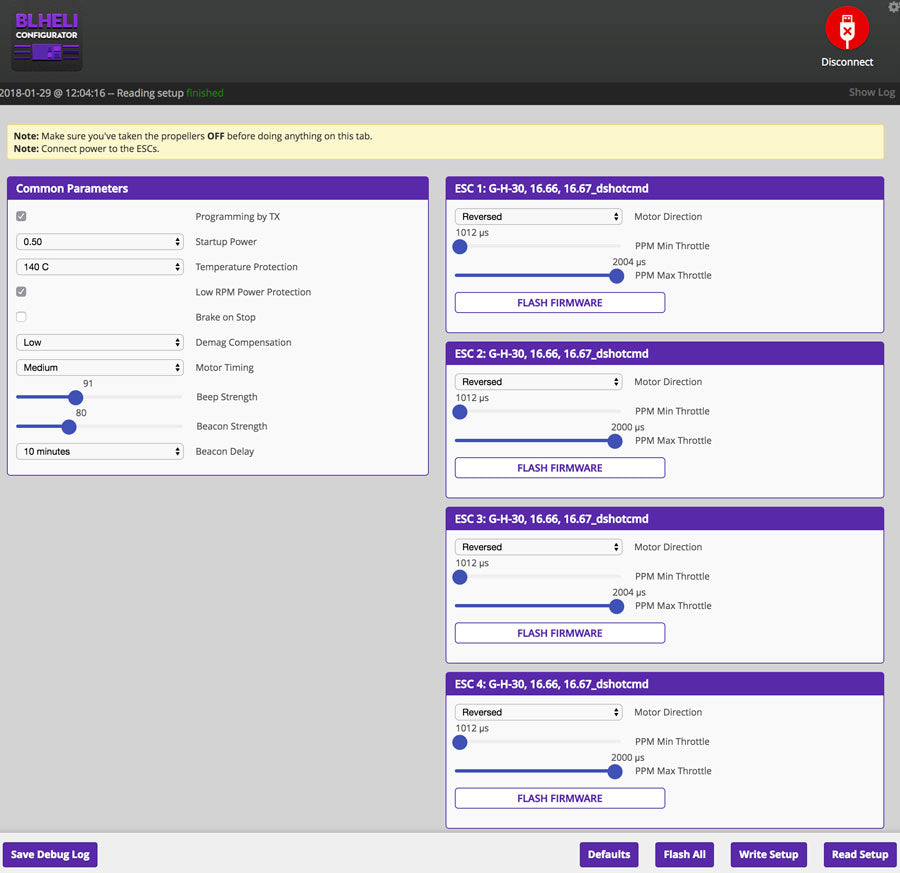
To get the BLHeli Configurator, download Chrome and install it. Then add BLHeli Configurator. If you already downloaded the correct drivers for Betaflight, you should be able to connect without issue.
With your battery plugged in, launch BLHeli Configurator and click Read Setup. Click Flash All, then select the version firmware you want and flash the ESCS. To use Dshot you must use a firmware at least v16.5 or older. Reverse any motors that aren’t spinning in the correct direction. Click Write Setup then disconnect.

Custom Start tones
In BLHeli version 16.67 you can have different start up tones by adjusting the Beacon strength
- 01 – Stealth Mode (silent startup)
- 91 Star Wars Imperial March
- 92 Crazy Start tone
- 93 Game of Thrones
- 94 HG Startup Tone
- or leave it at 40 for the standard startup tone.


Select Serial RX for UART1 and TBS SmartAudio under Peripherals on UART6.

These are my PIDs for this setup with the Tmotor Air40 2450KV. You can just adjust the rates to your preference. I like my rates around .5 for racing but higher for freestyle.


AUX1 is setup for Arm/Beeper and AUX2 is to enable turtle mode.

Motor Beeper
To enable the beeper function in BLHeli, first assign a switch in the Modes tab for the beeper then go type this command in CLI:
set beeper_dshot_beacon_tone = 3
type save, enter
the number at the end is the strength of the beep, low to high 0-5. Just keep in mind the louder the beep the more strain it puts on the motors. I think 3 is a good balance.
Turtle Mode
Turtle mode is a feature you can enable that lets you reverse the direction of the motors to help you flip the quad over if you crash upside down.
- Leave the Accelerometer feature on in the configurations tab
- Make sure your ESCs are flashed to the at least version 16.67
- Enable Dshot600 on the configurations screen
- Set up a switch to enable “Flip Over After Crash” in the modes tab
- In CLI commands type: set small_angle = 180, type save and enter
BetaFlightOSD
Enable all the elements you want to show in your osd then drag them into position.

To get into the Betaflight OSD menu from the Taranis
- Power up the quad and turn on the Taranis
- With the quad disarmed, on the Taranis sticks, (left stick) mid throttle, YAW left, (right stick) pitch up
- to adjust PIDs, PROFILE – PID. Change your settings then go back to the main screen and save and exit
- to change VTX channel/band/power – Features – VTX SA. Change your settings then select SET, Confirm
Finish up the Ultralight Quad Build
Use the small carbon fiber plate included with the PROton to mount the TBS Unify Race using some strong double sided tape like the Gorilla tape. Remove the pigtail off the VTX so you can use the AXii u.FL. Mount the VTX on the quad and slide the TPU antenna mount. Install the u.FL on the VTX and put some Bondic on the u.FL connector to help keep it on. Mount the camera and plug in the connector. Mount the top plate and thread the antennas in the antenna ports. Watch the video on how to turn off the Foxeer camera OSD so it wont overlay with the BetaFlightOSD. Done with the build!


 This ultralight quad build using these motors came out to about 238g shown. I think the optimal weight for an intermediate quad is around 250g with props. With a 1300mAh 4s and HQ Props 5040 tri blades I can get between 4-7 min depending on how hard you lay on the throttle. Of course this ultralight quad build can get lighter if you sacrifice power and go with some 20g motors like the Hyperlite floss motors.
The combination of a light quad, moderately powered motors and a strong frame makes it the perfect setup for someone who is wanting to get into racing. Having long flight times and an easy to control quad will give you lots of stick time on the track. Until you find yourself at the top end of the throttle ripping around the track and feeling like you need more power, this ultralight quad build the perfect setup. When you need something faster, I’ll have the race PROton build coming up soon.
If you found this post helpful, it would be super cool if you purchased the components from my store or purchase items from my Amazon links. These posts are expensive and take a loooong time to make so the purchases make it possible for me to keep making them. Thanks in advance, I greatly appreciate it 🙂
