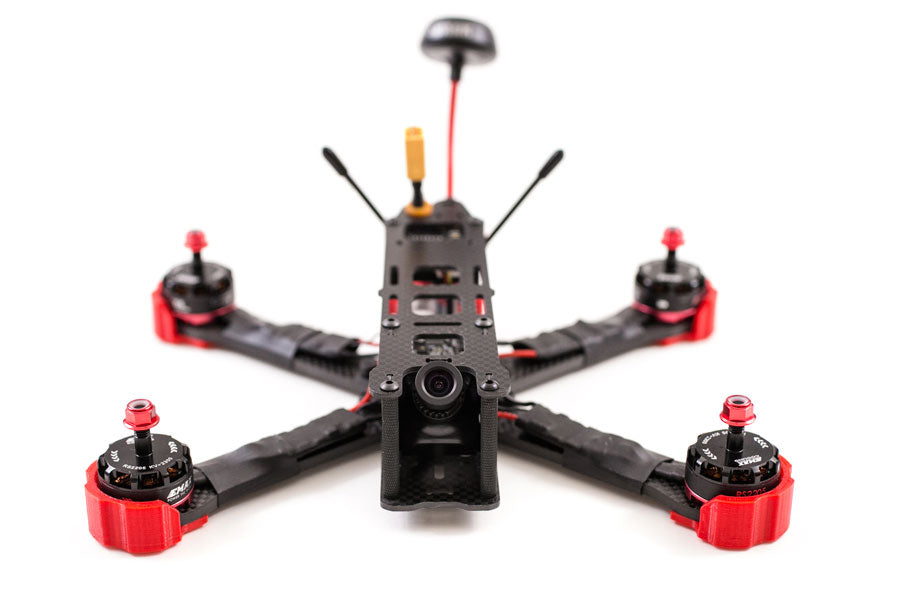
How to Setup a Lumenier QAV-R
How to Setup a Lumenier QAV-R
In part 1 of the Lumenier QAV-R build we did all the physical build of the quad. Part two will be programing the QAV-R. Good news is that it’s very simple! Follow the directions below and it’ll be a piece of cake.
Taranis Setup
If you are building the Lumenier QAV-R kit, it will come with a Taranis bin file that has everything already programmed for you. All you have to do is plug the microSD memory card from the Taranis into your computer. Inside the card will be a folder called Models. Drag the Taranis bin file into that folder. Put the SD card back into the Taranis. Go to the models page in the Taranis and scroll to an empty slot. Press and hold enter and select restore model. Pick the model you just dragged into the memory card. Once you do that everything will already be programmed for you. Done!
First thing we need to do is create a new model on the Taranis, assign all the switches, bind the XSR and setup telemetry. Watch the video above on how to do that.
When you bind the XSR rx to your taranis, make sure the mode is set to D16.
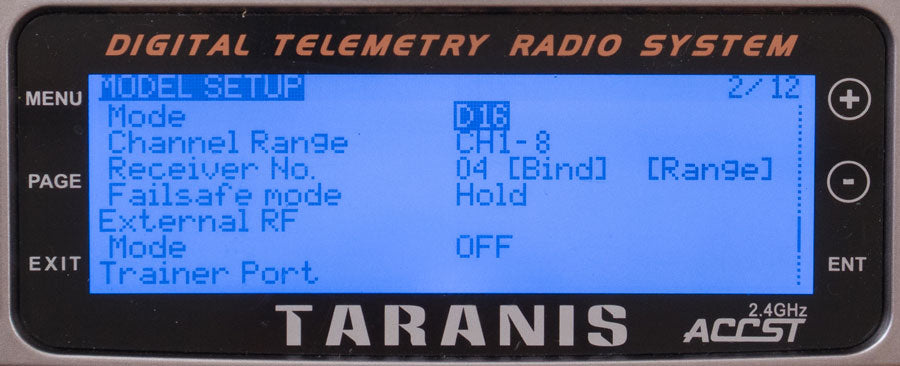
We’ll set up our switches this way:
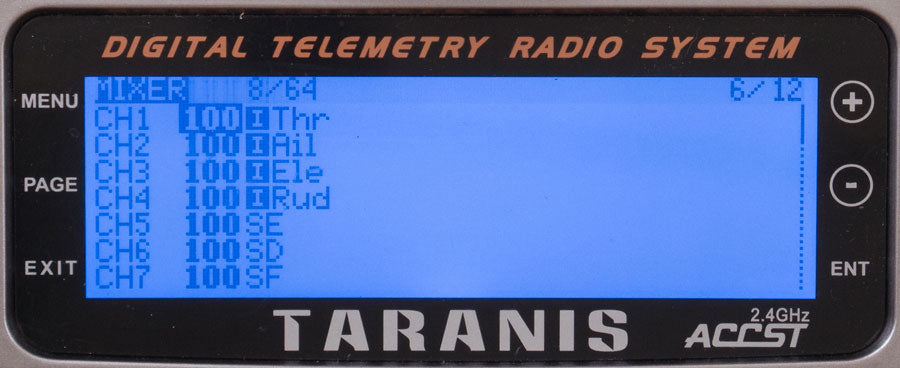
Channels 1-4 can’t be assigned to switches. These are reserved for controlling the quad: throttle, aileron, elevator, rudder.
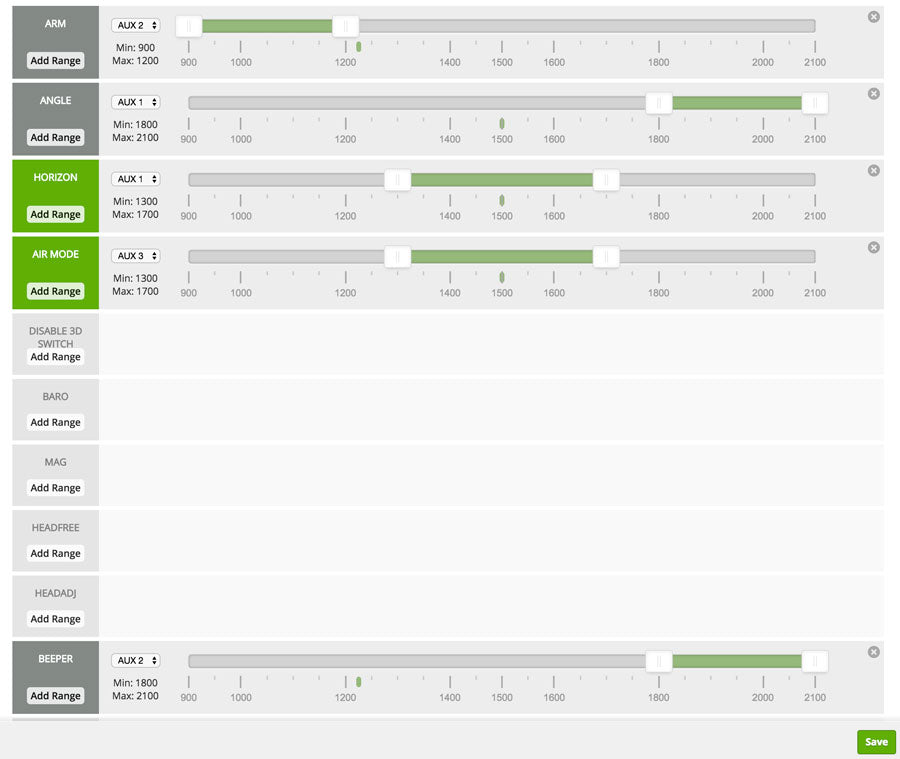
Channel 5 – (AUX1): Flight Modes (angle, horizon and acro)
Channel 6 – (AUX2): Arm/Disarm, Buzzer
Channel 7 – (AUX3): Airmode (optional)
Taranis Telemetry
These are the logic conditions for telemetry. These are just some basic logics I have set. Once you learn the basics here you can create your own logics.
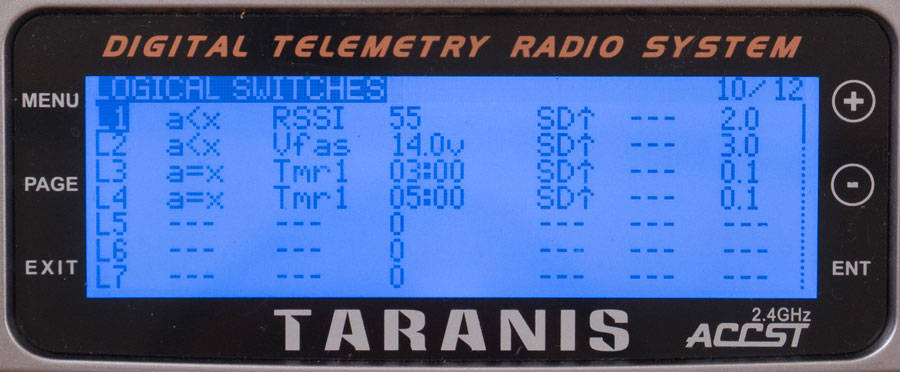
L1 when RSSI is less than 55 in the SD up (armed) state for 2 seconds.
L2 when Vfas (lipo battery voltage) is less than 14v in the SD up (armed) state for 3 seconds.
L3 when the timer equals 3 minutes in the SD up (armed) state for .1 second.
L4 when the timer equals 5 minutes in the SD up (armed) state for .1 second.
When these logics are true, then these functions will occur.
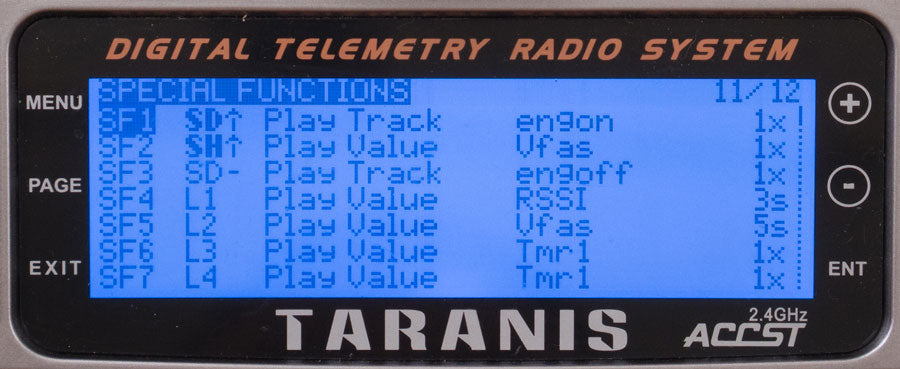
SF4 – L1 = true, the Taranis will play RSSI once every 3 seconds
SF5 – L2 = true, the Taranis will play Vfas (battery voltage) once every 5 seconds
SF6 – L3 = true, the Taranis will play Tmr1 once
SF7 – L4 = true, the Taranis will play Tmr1 once
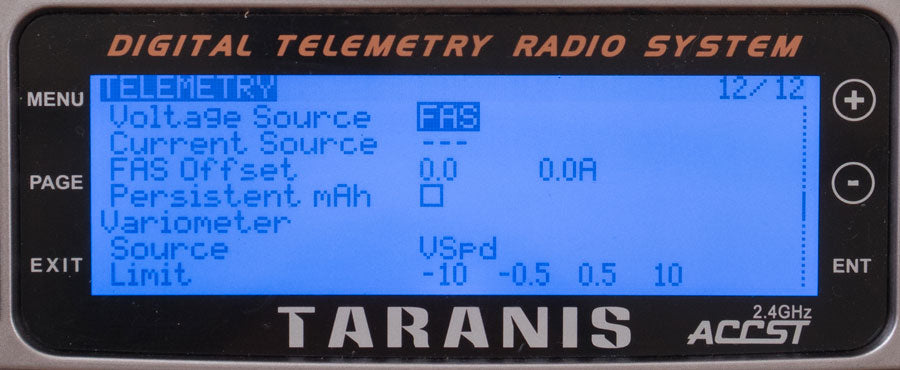
Before you can get the voltage warnings to work, you have to tell the Taranis what you want to assign for battery voltage. Go to the Telemetry screen and assign FAS as the Voltage Source.
Telemetry Screens
The Taranis is able to display 3 different telemetry screens each with 12 functions. Here’s an example of my screen.
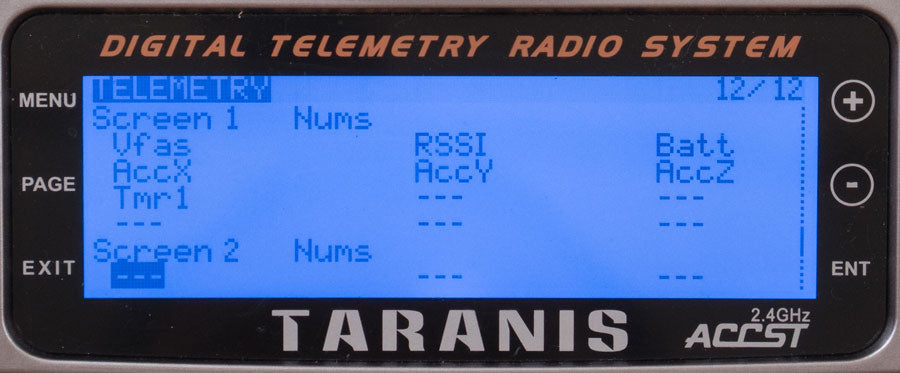
Vfas is the battery voltage of the QAV-R and Batt is the Taranis battery voltage.
Flash BetaFlight
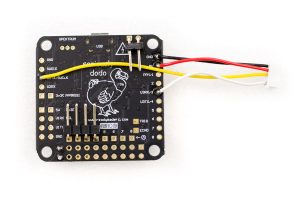
Next we’ll flash BetaFlight on the DODO flight controller.
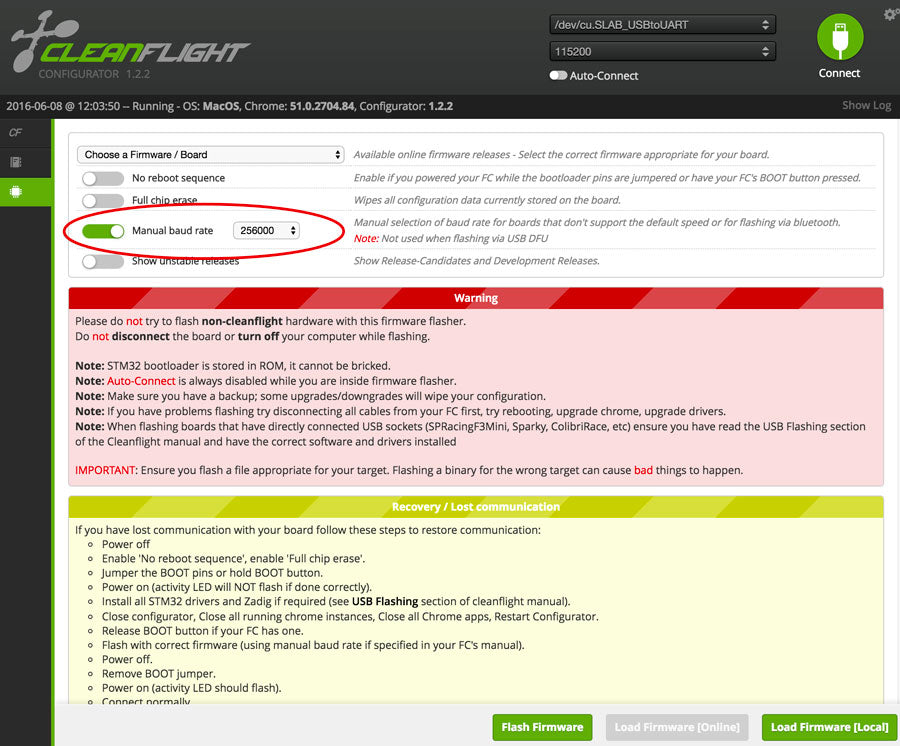
- In Chrome, install CleanFlight configurator.
- Download and install the correct CP210x USB to UART Bridge VCP driver for your computer system if you don’t already have it.
- Download the HEX code for BetaFlight. Go here, scroll down to Downloads and find the HEX code for RMDO.hex, click and download.
- Open CleanFlight and connect the USB to the DODO.
- Go to “Firmware Flasher” on the left.
- Turn on Manual baud rate, 256000
- Click “Load Firemware [Local}” on the bottom right.
- Select the RMDO.hex file you downloaded in step 3.
- Click “Flash Firmware”
- Done. Click connect. Your DODO is now running BetaFlight
Common reasons why your DODO won’t connect to CleanFlight
- The VCP driver wasn’t installed or the wrong version was installed.
- The wrong COM port was selected
- Something wrong with the USB cable. A lot of my readers have run into this issue. I use this AmazonBasics USB to Micro-USB cable and it works fine.
- Sometimes I have to open Cleanflight first then plug in the DODO before the SiLabs com port will show up.
Cleanflight Settings
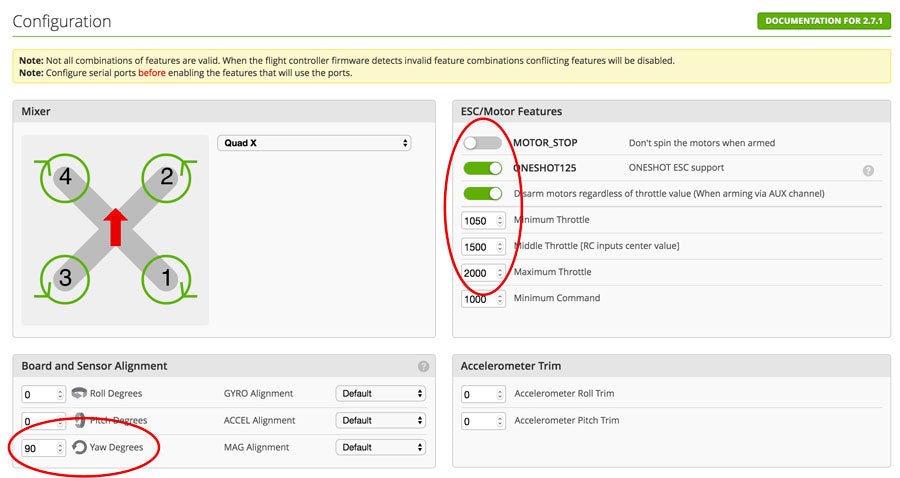
 Here are the settings you need to for the QAV-R setup. Make sure you hit save and reboot before moving on to the next screens.
If you are building from the Lumenier QAV-R kit, all you have to do is flash the DODO flight controller with BetaFlight and calibrate the ESC and accelerometer. Then restore the settings from the backup file. The kit comes with a backup file that will program all the settings for you in Cleanflight. After you flash the DODO with BetaFlight, click restore from the main page. Select the .txt backup file and click ok. Done, all the screens are all setup for the QAV-R.
Turn on serial RX on UART3 for your SBUS. Then enable Telemetry by selecting SmartPort on UART2. This will tell the DODO where the telemetry info is coming in on the SmartPort wire.
Ports

Configuration
Sometimes when I calibrate the ESC with OneShot on, I get some yaw twitch issues so I turn it off for ESC calibration. Set min Throttle to 1000 and max throttle to 2000. (see video above on ESC calibration process). Change the YAW correction to 90 degrees because we have the DODO facing the right side of the quad.
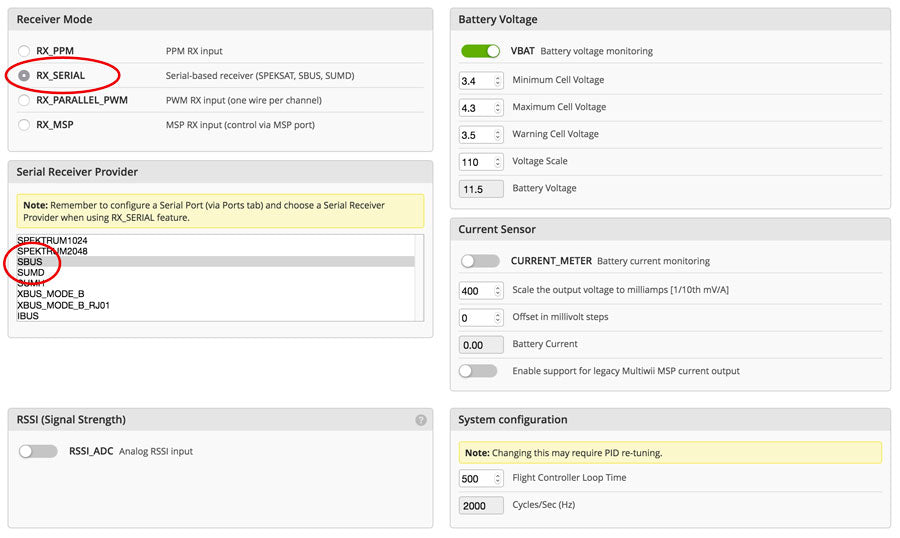
In the receiver mode, select RX_Serial and SBUS in the serial receiver provider because we have the XSR running in SBUS mode.
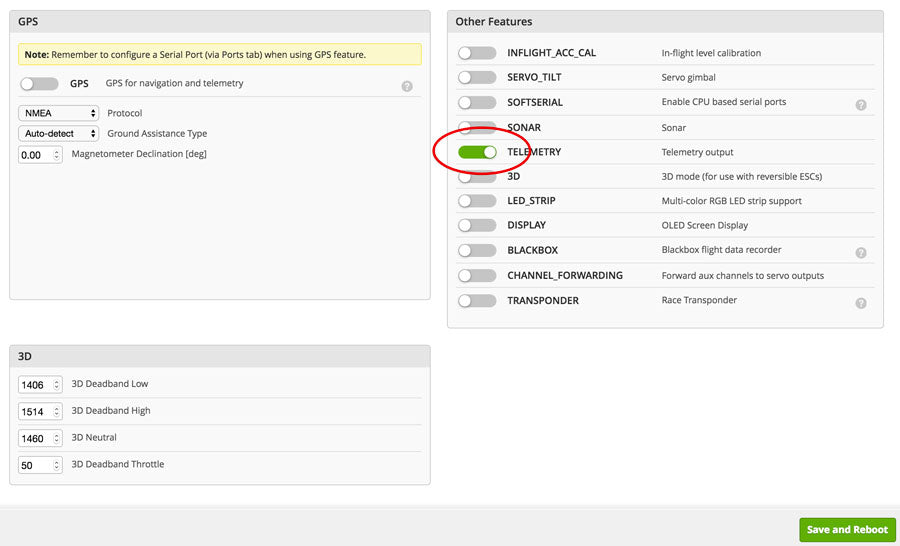
Enable Telemetry in the features.
PIDs
Here are some good general PIDs for having fun and goofing off. Make sure you are using the LuxFloat PID controller for the DODO. It flies beautifully.
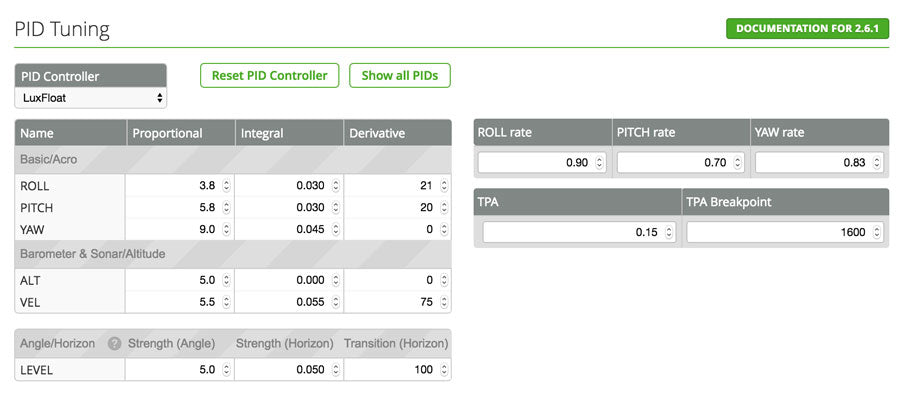
Here’s a quick mini breakdown on PID tuning.
- P – Proportional – this is the setting that will have the most effect on your quad. This is the amount of effect your stick movements have on your quad. Given the exact same amount of stick movements, a high P will move the quad a lot more than a low P value.
- I – Integral – This is how well your quad holds it’s position. Too low and your quad will try to come back to level quickly. Too high and your quad will over correct and feel slippery with bad control.
- D – Derivative – This is how quickly your quad will return to it’s original position.
- Rates – This is how much effect the sticks have at the end of stick movements.
Receiver
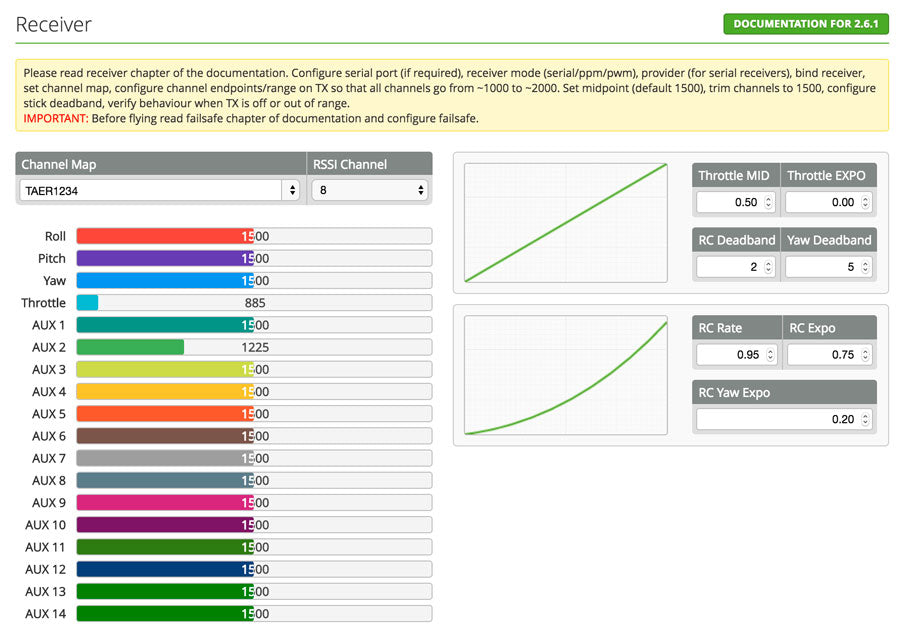
In the receiver tab is change the Channel Map to TAER1234. If you don’t your sticks won’t react correctly. Change the deadbands, RC and Expos.
Modes
ESC Calibration and Motor directions
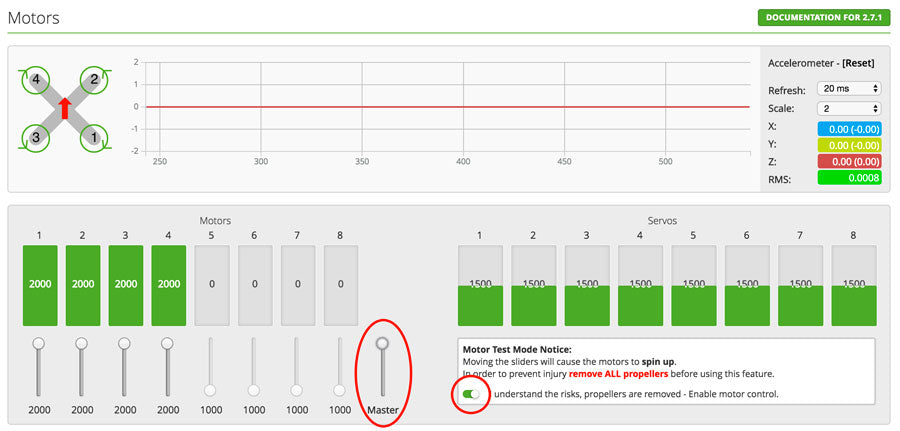
*Make sure this part is done with the PROPS OFF*
Plug in the battery and hit Motor Test Mode. Move each individual slider to make sure the correct motors spin up and in the correct direction according to the diagram in the top left corner. If the motor is spinning the wrong direction, reverse any two of the three motor wires. This will make the motor spin the opposite direction.
Next calibrate the ESC. With the battery unplugged, turn on motor test mode and move the master slider all the way to the top. Plug in the battery and you’ll hear a series of tones. Before the tones end, move the master slider all the way down.
Unplug the battery and reconnect. Move the master slider up slowly and see if all the motors spin up approximately the same time.
Then go back to the configurations screen and turn on OneShot and change min throttle to 1050.
Congratulations, you are finished!
Once you’ve verified the correct motor direction and calibrated the ESCs, you can shrink the heat shrink on the ESC and arms.
Conclusion
The QAV-R is currently my favorite quad. It’s a fairly easy frame to build as you can see. The frame is super tough. I’ve flown into many things and have yet to break anything on the frame. The balanced frame combined with the DODO flight controller makes even a crappy pilot like me look like I know how to fly.
If you found this post helpful, it would be super cool if you purchased the components from my store or purchase items from my Amazon links. These posts are expensive and take a loooong time to make especially this one! Some of the segments in the video I had to reshoot 3-4 times because CleanFlight was messing up my screen recording and making the separate audio tracks not sync up. The purchases make it possible for me to keep making them. Thanks in advance, I greatly appreciate it 🙂
