How to Setup a Lumenier QAV-X
Time to finish up the QAV-X build! In part 1 of the build, we did all the soldering and physical build. Part 2 we will program the Taranis, flash and configure the KISS FC then go for some test flights.
Parts used in this QAV-X Build
- Lumenier QAV-X 4mm
- KISS FC
- DYS XS20A
- EMAX RS2205 2300KV
- HS1177 Camera
- PowerOSD PDB
- Lumenier 600mw VTX I put a 200mw VTX on one of the QAV-X and it flew fine. If you race you’ll want to use a 200mw max power vtx.
- TBS Triumph Antenna or Foxeer Antenna (These gave me just as good of a image as the TBS antenna. Pick up a backup antenna.)
- Taranis X9D+
3D Parts
The QAV-X Build Kit will include everything listed above plus a bag of misc parts (heat, shrink, buzzer, vbat cable…), backup files for the Taranis and KISSFC and the cheat sheet.
Let’s get Started!
The setup on the KISS FC is a little quirky. You have to do part of the setup in the KISS configurator, then setup the Taranis, then go back to the KISS configurator. You’ll see why.
Flash the KISS FC
- Download most current firmware from here. As of this post, the most current is v1.02RC28
- Download Chrome if you haven’t already.
- Add the KISS FC configurator
- Hold down boot button and connect usb. Keep button held down until flashing is done.
- Load firmware and flash
- Done. Get a beer
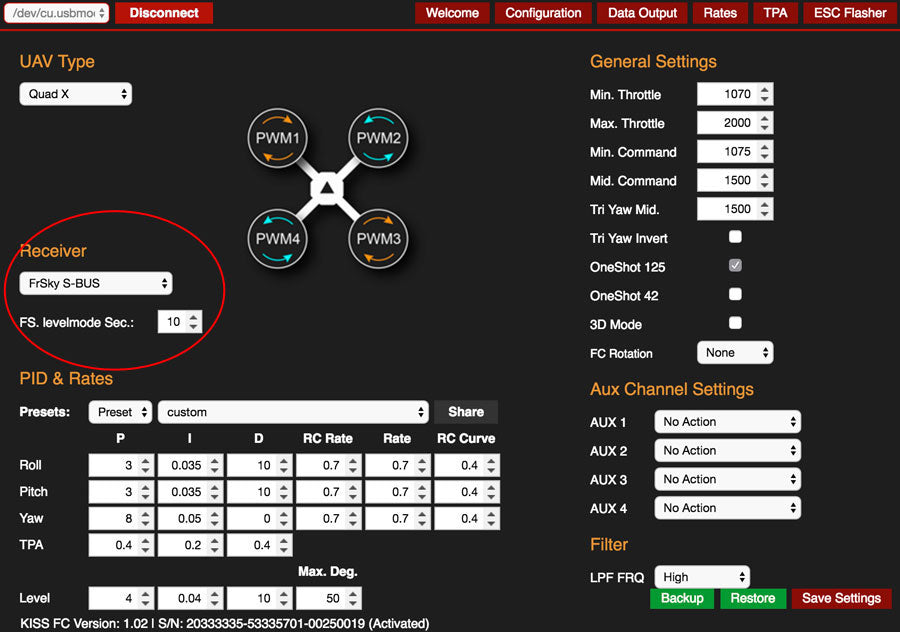
For now, there’s just one setting that needs to be in the KISS configurator. Under the receiver tab, select “FrSky S-BUS”. Hit save.
Taranis Setup
Even though I was perfectly happy with my old beat up original Taranis running firmware 2.0.8, I got a brand new Taranis Plus running the latest firmware 2.1.8 just so it would make it easier for everyone to follow along with the setup. Good excuse to get a new transmitter eh?
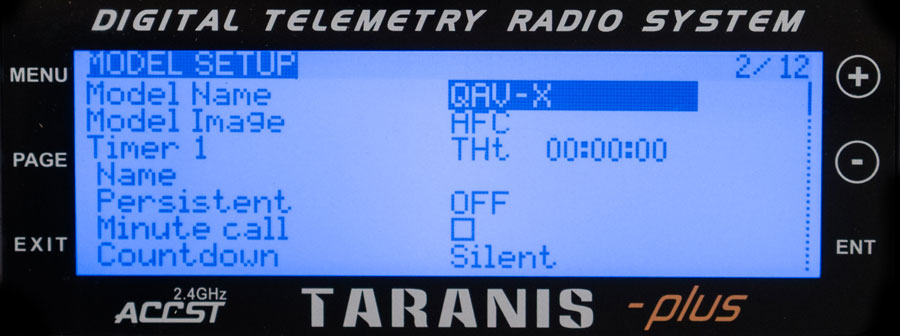
First, create a new model and name it whatever you want. Set Timer 1 to “THt”. This timer only starts when the throttle goes above zero not when you turn on the Taranis.
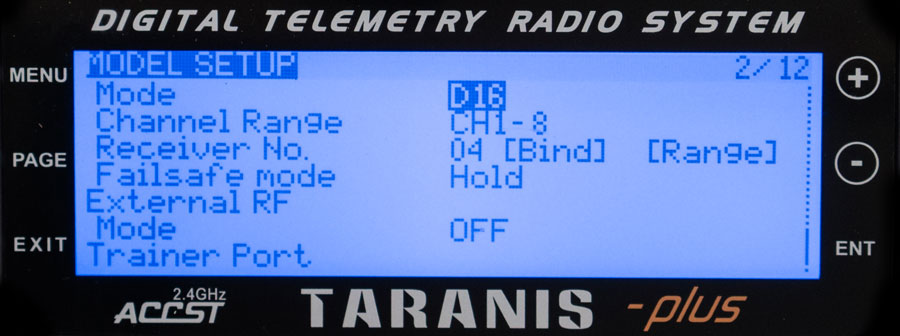
Then bind the Taranis to the XSR. Install the XSR on the QAV-X. Change the mode to D16 and select bind. The Taranis will start beeping. Hold down the failsafe button on the XSR while plugging in the battery. Unplug the power and exit out of binding on the Taranis.
Set up the switches you want for Arm, buzzer and flight mode.
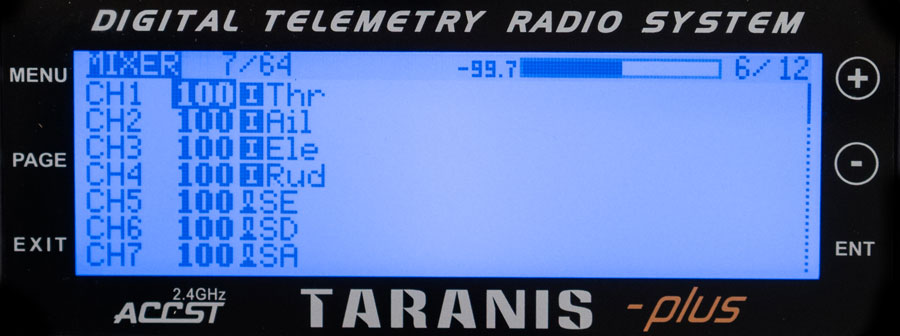
This is how my Taranis is set up:
- SE switch is flight mode
- SD is Arm/Disarm
- SA is buzzer
Taranis Telemetry 101
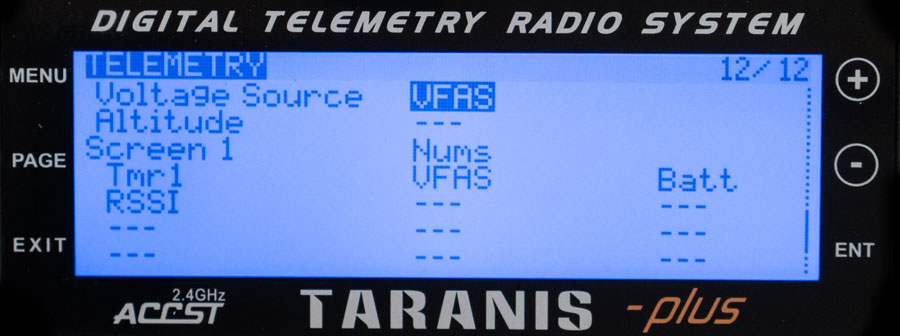
After you configure the KISS FC to use FrSky S-BUS as your RX, in the Taranis firmware 2.1.8 you have to do an extra step to get VFAS and RSSI to show up. Plug in the battery with the XSR installed/bound and scroll down to page 12/12 telemetry screen. Go hit “Discover New Sensors” and a lot of new sensors will show up including the VFAS and RSSI.
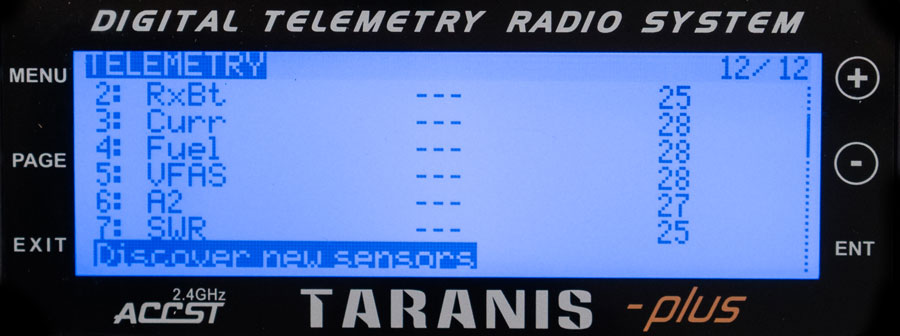
To save time, I’ll just show my telemetry screens and logic screens. For a better explanation check out out my other post on the Taranis telemetry.
To set up the Taranis telemetry, there are two main parts, Logic and Special Functions (actions). Here are my Taranis screens for the telemetry. This will give you an idea of how to set up the logic and actions. You can play around with this and configure this to do whatever you want. Here’s the basics.
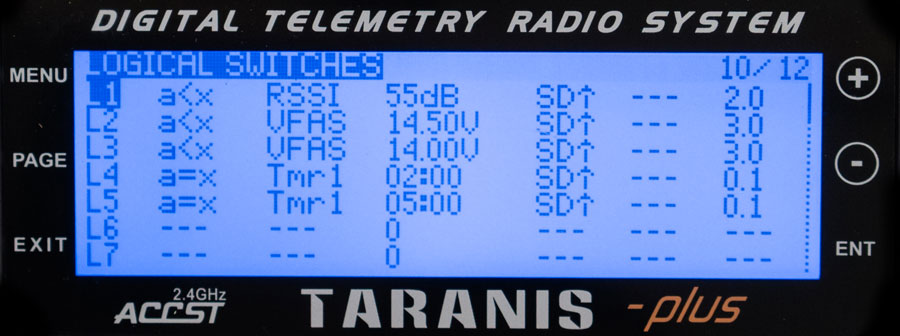
Logical Switches
- L1 sets the low RSSI threshold at 55
- L2 low battery voltage warning 14.5v
- L3 critical battery voltage set at 14v
- L4 throttle timer (THt) 2 minutes
- L5 throttle timer (THt) 5 minutes
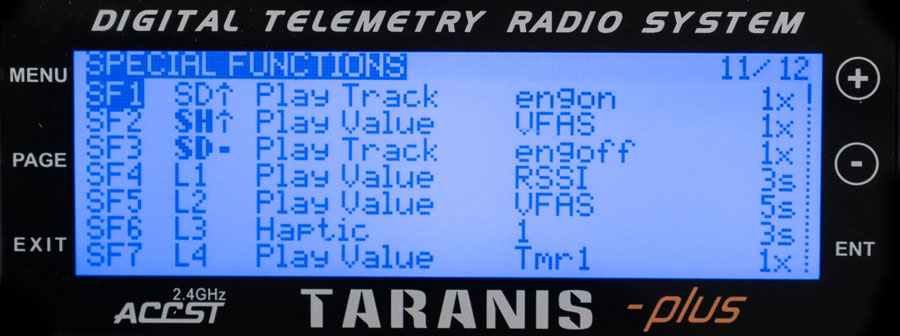
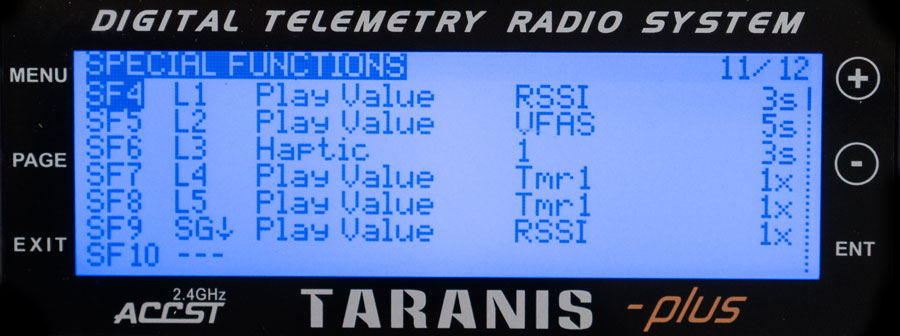
Special Functions
- SF1 play track “engine on” when the quad is armed
- SF2 SH up will play the battery voltage
- SF3 play track “engine off” when the quad is dis-armed
- SF4 when RSSI drops below 55, speak RSSI value
- SF5 when battery drops below 14.5v speak battery value
- SF6 when battery drops below 14v vibrate Taranis
- SF7 at 2 minutes, speak timer
- SF8 at 5 minutes, speak timer
- SF9 SG down will speak RSSI value
Telemetry Screen
Set Voltage Source as VFAS. The telemetry screen has 12 placeholders for display options. You can configure it to show whatever you want.
KISS FC Configuration
See this post for more info on the KISS FC.
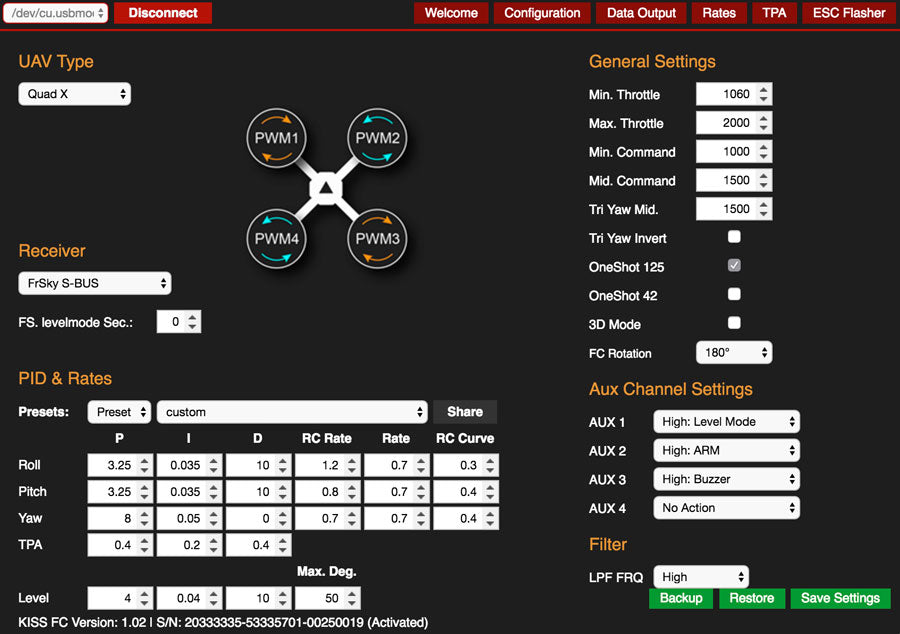
- UAV Type “Quad X”
- Receiver “S-BUS”. All you have to do is select this to have the telemetry info setup. No port configuration or any other options to enable like in CleanFlight.
- FS. Levelmode Sec “0” this is your failsafe. I want my quad to drop immediately if I lose rx signal so it’s set to zero.
- Min Command “1000”. Default is 1070. In order to enable AirMode, Min Command needs to be set to 1000 and the Arm function is set to a switch. If you don’t enable AirMode you won’t have any control at zero throttle.
- FC Rotation “180” Only set this if you have the arrow on the KISS FC facing the rear.
- Set the switches for your Taranis, Arm, Buzzer, Level…
ESC Calibration
If you are using KISS ESC with a KISS FC, no calibration is needed. But since we are using XS20A we’ll need to calibrate the ESC.
To calibrate ESCs in the KISS configurator
- Put the KISS FC in disarm mode with the Taranis
- Connect FC to USB and set Min Throttle to 2000, hit save
- Arm the FC with your transmitter, no battery
- Plug in the battery, wait for the calibration chime
- Disarm the FC
- Unplug the battery
- Set Min Throttle back to 1060 or whatever you like, save
- Disconnect and unplug USB
PIDs
The KISS FC flies so well you can almost keep the PIDs stock. It flies rock solid with stock pids. You just need to play with the rates and curve to suit your liking. The RC Rate is the amount of Roll/Pitch/YAW at the end of the sticks. The higher the number, the faster the quad will roll/flip at the end of the sticks. RC CURVE is if you want a fast roll/flip but want less reaction around the center sticks. A lower curve like .1 will make the quad have twitchy reactions near center sticks. A higher curve like .6 will make the center sticks less reactive, mushy or smoother. General tip, if you want smooth video use a higher curve. If you want a more reactive but twitchy quad, use a lower curve. Play with the setting until you find a setting you like.
Finish the Build
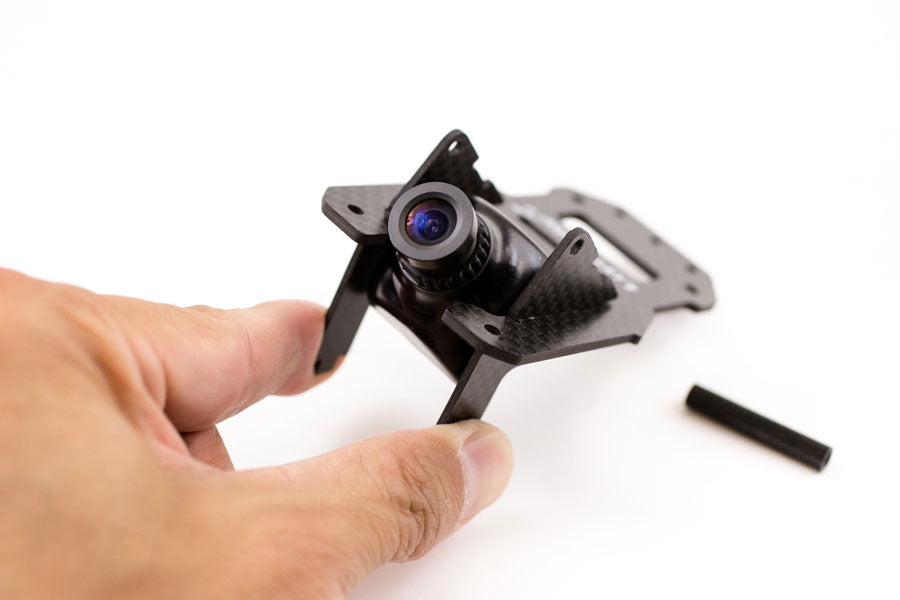
Now all the programming is done we can finish building the rest of the QAV-X. Here’s a tip on how to mount the FPV camera in the frame. Install the two small camera side plates on the top plate. Set the angle like below.
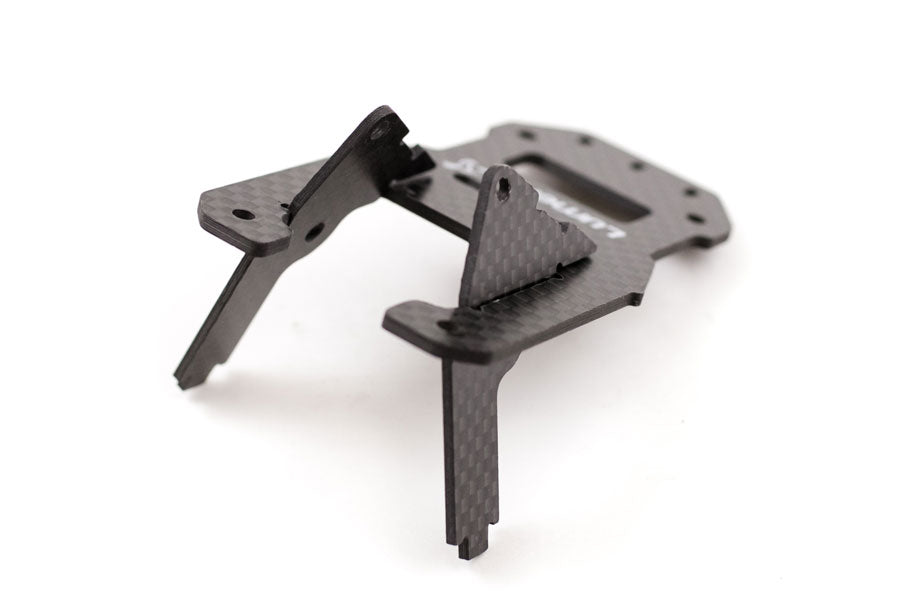
Line up the screw holes on the camera to the holes on the side plates.
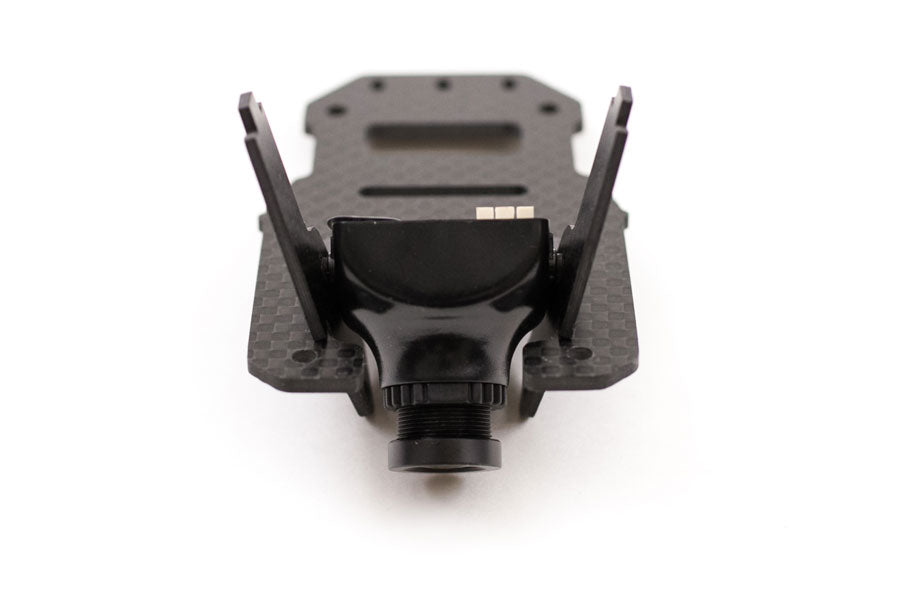
Once they are lined up you can pinch the bottom end of the two side plates. This put the camera perfectly between the plates and you can easily install the standoff on the top.
Use the Lumenier TX5G6 3D mount to install the VTX. If you are using a VTX other than the one I’m using I have a center SMA and offset SMA VTX mounts available. These should making mounting any mini VTX easy.
Wrapping up the Lumenier QAV-X Build
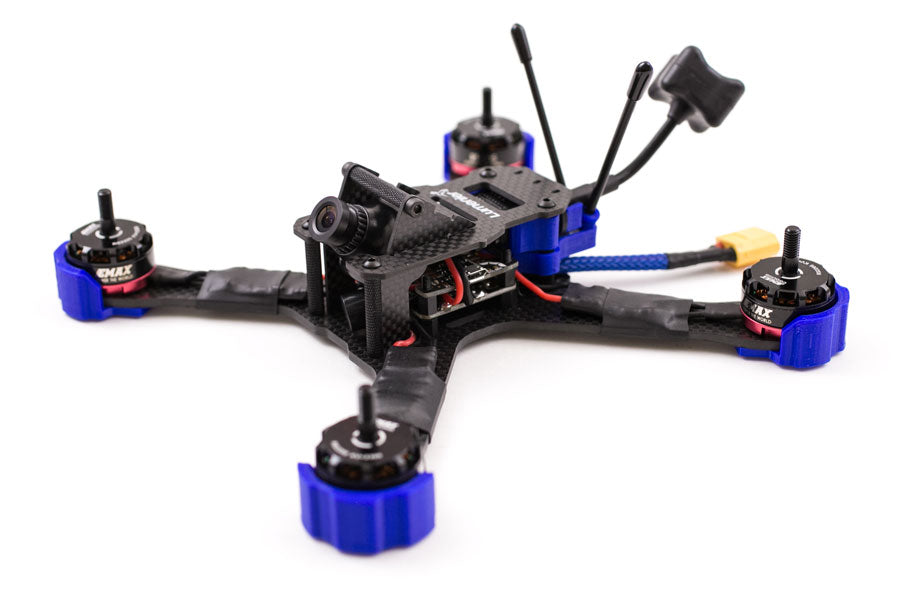
I love the QAV-X. The X frame, the position of the battery and GoPro make the quad feel extremely balanced. All up weight with the 3D protection is only 356g (no battery or GoPro). This is pretty light for a frame that swings 5″ props. Compare this to the ImpulseRC Alien 5″ which is 415g. I’ve been testing the QAV-X along with the Alien the past month and I can tell you when I fly the QAV-X then the Alien there is a big difference. The QAV-X feels much more nimble. You can really feel the 75g weight difference when you punch the throttle.
One of the selling points on the QAV-X is the built in GoPro mount. Good thing is that it works great. The flight videos at the end of the video where made by just the GoPro directly mounted on the frame with a velcro strap.
Another great frame from Lumenier! Highly recommended!
If you found this post helpful, it would be super cool if you purchased the components from my store or purchase items from my Amazon links. These posts are expensive and take a loooong time to make! The purchases make it possible for me to keep making them. Thanks in advance, I greatly appreciate it 🙂

