In part 1 of the 6s quadcopter long range build, we did all the physical build and soldering. Part 2 of the build will be binding the TBS Crossfire Micro TX to the Nano RX, flash ButterFlight with settings, BLHeli32 and flight footage.
Parts used in this build
- FlightClub PROton Skeleton
- 6″ Arms for 5s long range setup
- 5″ for 6s quadcopter race setup
- TBS Crossfire Nano RX
- TBS Crossfire Micro TX
- Immortal T Antenna
- PROton Immortal-T Mount
- Tmotor F40 PRO v2 1600kv
- Aikon AK32 35A ESC
- Helio Spring Flight Controller
- Foxeer Arrow PRO
- TBS Unify v3 25-800mw VTX
- Lumenier AXii Stubby
- PROton GoPro Session Mount
- GoPro Session
A build kit is available for this build. It will include the cheat sheet, Taranis program file, ButterFlight program file (CLI dump) and all the small misc parts needed for this build.
Tools Used in this Build
- Weller Solder – I’ve had this workhorse for over 15 years. Still going strong.
- Gorilla Glue Heavy duty double sided tape – super strong double sided tape. Works even in the cold.
- Wagner Heat Gun for heat shrink – ditch the lighters. A heat gun will give you a much cleaner shrink
- Wiha Metric Hex Driver – my workhorse drivers
- Wiha wire stripper – love these wire strippers. it has a little screw that makes it easy to adjust for different size wires.
- Soldering Vise – Makes soldering boards easier
- Solder Wick – helps you clean up boo boos when soldering
- Butter Mount grommets – instead of nylon standoffs, these can be used to create a super low stack. can be cut in half to adjust for the perfect height
- Multimeter with continuity setting – a must for any quad builder
Other Recommended Parts Needed
Crossfire Setup
There are two things needed to be able to use the Crossfire, Taranis firmware version 2.2 LUA or newer and the most current version firmware on the Crossfire Micro TX. See this post on updating the Taranis firmware 2.2 LUA.
Before you bind the RX to the TX, you need to update the Micro TX to the latest version firmware. I had issues trying to bind the nano RX to the TX. It worked fine with the original Crossfire RX but it needs the most current version for it to bind to the nano. Once the TX is on the latest firmware it’s super easy to bind.
To update the Micro TX
- Download TBS Agent
- Plug in the Micro TX to the computer via USB
- In the dropdown, select the most current firmware, I’m using v2.32
- Click Update
- The LED on the back of the Micro TX will slow flash yellow
- Let the process finish, done.
Before you bind the RX to the TX, you need to update the Micro TX to the latest version firmware. I had issues trying to bind the nano RX to the TX. It worked fine with the original Crossfire RX but it needs the most current version for it to bind to the nano. Once the TX is on the latest firmware it’s super easy to bind.
Bind the Crossfire RX Nano
Power up the quad. The green LED on the Nano will slow blink green. Turn on the Taranis with the Micro TX plugged in. Press and hold the menu button and scroll down to page 2/9. Select CROSSFIRE.

Highlight crossfire.lua Press and hold – select Execute

Right now only the TX option will be shown.

Select Binding. Select Update Receiver. The LED will turn red on the RX then flash green rapidly when it’s transferring the data.

Once updated the Nano RX will show up.

Set the Failsafe Mode to Cut

Set output map like the image below.

Set the RSSI/LQ (link quality) to output on Ch8 which is AUX 4

The Crossfire RX should now be bound and setup in the Taranis.
ButterFlight
All the drama aside, ButterFlight is awesome. ButterFlight is a fork of BetaFlight but with some special filter mojo added. I use ButterFlight on all my BetaFlight boards now. There is a noticeable improvement in the flight performance. The Helio Spring comes flashed with ButterFlight but it’s usually a good idea to flash the firmware to the newest (stable) version.
Flash ButterFlight
- ButterFlight d0wnload the configurator for your computer system. As of this post 10.4.2 is the most current version
- Open and install the program
- Download and install the VCP and CP210 drivers if you haven’t already
- Plug the Helio to the computer via USB cable
- Click Firmware Flasher
- In the top drop down menu, select “HELIOSPRING”
- In the bottom drop down, select the most current stable firmware. As of this post it’s 3.5.1: 1.0.6-RC9
- Click “Load Firmware
- Click “Flash Firmware”
Once you have ButterFlight on your computer, plug in the Helio and connect. Before you do any settings go to the CLI tab and type “imufupdate” and hit enter. This will set all the baseline settings in the Helio.

In the Ports tab enable Serial RX for UART3 and on UART5 select TBS SmartAudio for Peripherals

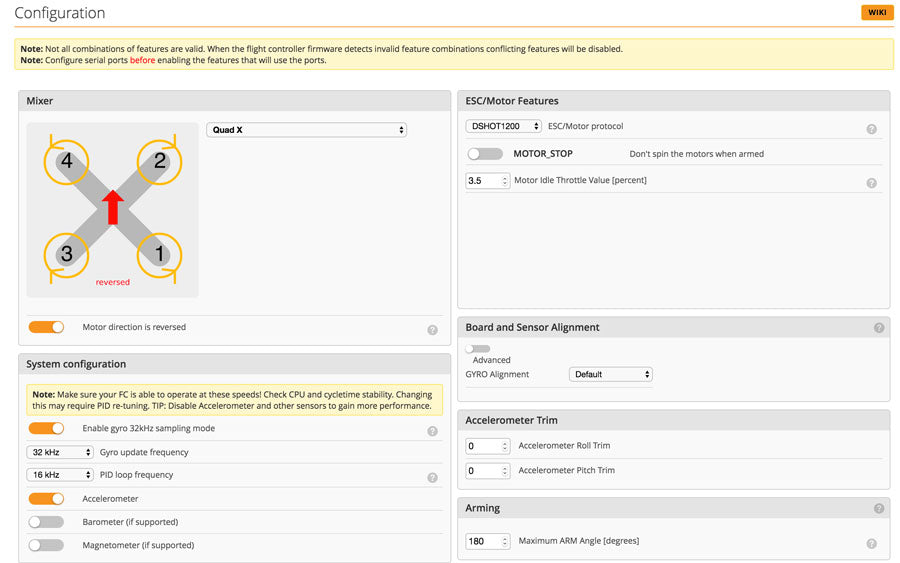
In the Configurations tab, I like to run reversed props. I find my camera lens stays cleaner because the props aren’t flinging grass into the camera. Select DSHOT1200, enable 32kHz sampling, 32/16kHz.

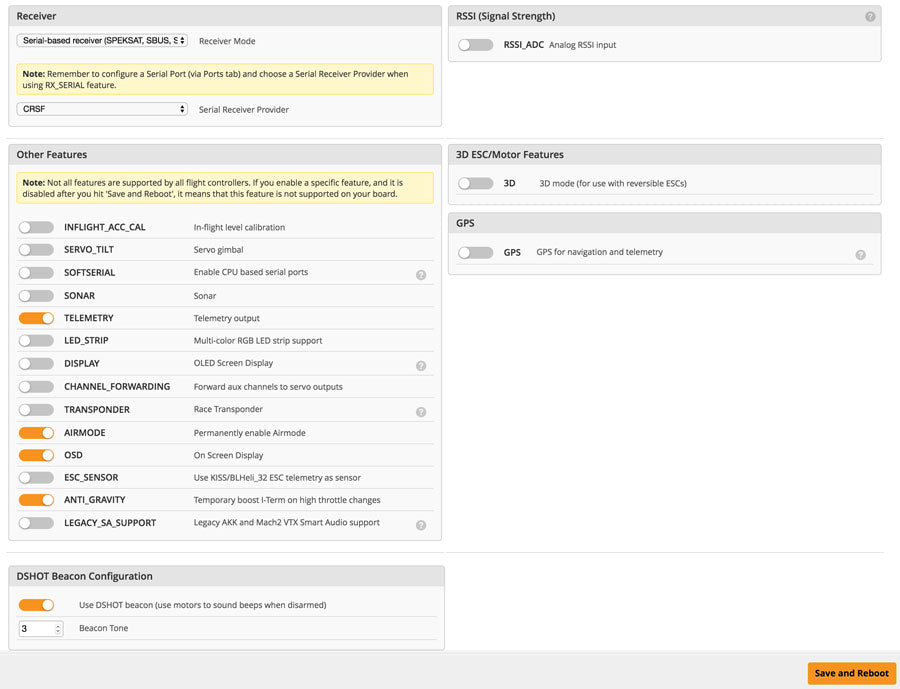
For the Receiver select Serial-based receiver and CRSF for the crossfire. Set the other features as the image below

Since ButterFlight puts out so many updates I didn’t show any PIDs in the video. The PIDs can’t be changed in the video but I can easily update the PIDs on the website for whatever firmware I’m currently using. These are the PIDS I’m for both the 6s quadcopter racer and 6″ long range quadcopter on 3.5.1: 1.0.6-RC9. Yes, these PIDs are nearly stock. That’s how good the Helio with ButterFlight is. If it’s not broke, don’t fix it.
For the 6s quadcopter racer, the rates are more subdued at around 450 degree/second.

For the freestyle, the rates are a bit snappier at around 1000 degree/second. Very soft in the center but fast rolls and flips at the end of the sticks. This will help in getting very smooth HD footage.


Change the channel map to TAER1234 and set the RSSI Channel output to AUX 4.

Modes
To enable turtle mode.

Make sure you do the Motors tab with the PROPS OFF! Plug in the battery and spin up each individual motor to see if they correspond to the diagram on the top left. If any of the motors are not spinning in the correct direction, make a note of which ones that need to be reversed in BLHeli32.


BLHeli32
BLHeli32 is a stand along program that runs on windows only. Unlike BLHeli-S which is a App in Chrome. I’m using Mac so I have to run windows off Parallel.
- Download BLHeli32
- Open the folder and select the exe program file
- Plug in the battery on the quad and plug in the USB on the Helio.
- On the top, select “BHLeli32 Bootloader (Betaflight/Cleanflight)
- Make sure you are on the correct COM port on the bottom left
- Click connect then Read Setup
- Highlight the ESC you want to change the settings on and make the settings like reverse Motor Direction
- Click Write setup
- Repeat steps 7 and 8 for each ESC you need to make settings
- Once you are done close the program and you will hear a tone from the motors.

Finish building the 6s quadcopter
The rest of the build is pretty straight forward so I won’t get into it here. Watch the video.

Even on the stock PIDS with just slight changes to the D setting the quad already flies great on this setup. On stock pids the motors ran a little warm but lowering the D just a touch fixed the issue. Even after a balls out rip on 6s the motors are just slightly warm on a hot day.
This is a really fun quad. I love the versatility of the configurations. Being able to switch from a 6s quadcopter on 5″ arms to a 6″ long range cruiser in just a few minutes. It’s like bringing the right weapon to the fight.
If you found this post helpful, it would be super cool if you purchased the components from my store or purchase items from my Amazon links. These posts are expensive and take a loooong time to make so the purchases make it possible for me to keep making them. Thanks in advance, I greatly appreciate it 🙂

